



Overloud is an Italian brand that develops various types of audio software, either standalone and Plugin, to meet the needs of multiple categories of users, from musicians to professional sound engineers.
In this article I will focus on GEMseries, a collection of plugins inspired by famous historical hardware, which has attracted the attention of many users, myself included.
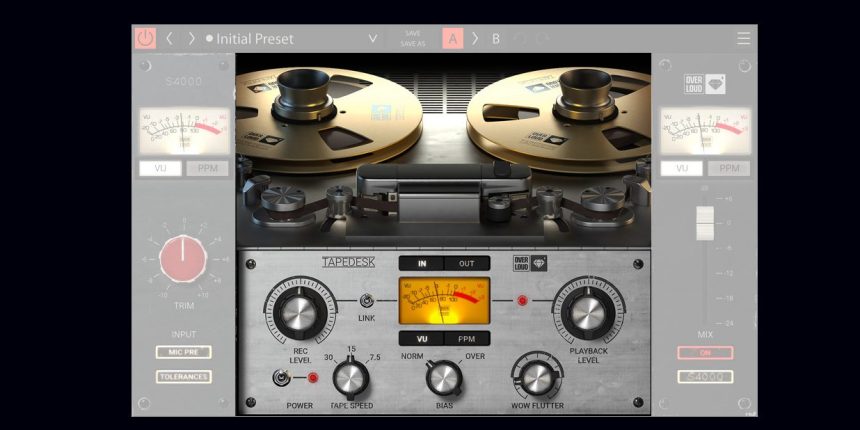
Today, in particular, I will deal with TAPE DESK, a plugin that emulates a system consisting of preamplifier, tape recorder e analog counter.
I will cover the main interface, describing the various commands and I will perform various tests, both audio and graphics, making various considerations. Finally I will draw the appropriate conclusions, to understand if this plugin is valid or not.
Premise

TAPE DESK it emulates the system you see illustrated: there is a source and a preamp of an analog desk. The output of this preamp goes to a tape recorder; subsequently, from the tape you return to the desk to monitor everything (on the channel).
It is an "old school" system, which is still used today, except that, instead of the tape recorder, there is a computer, a DAW, and everything is interfaced via converters AD DA.
It should be noted that to use the tape recorders, which have not been totally abandoned, one must necessarily interface with the devices listed above.
The main interface
I would like to start with a general overview of the various controls that make up this plugin, while later I will analyze in detail what happens when one or more of these change.

The system is compacted into a single interface: we have the section of input / MIC PRE (of the desk), the part relating to tape recorder and back on bench channel. Each section, among other things, can be deactivated.
This plugin offers three different analog virtual banks, inspired by famous models, to be precise: s4000 (SSL 4000), N80 (SNOW), T88 (TRIDENT).
Each section has a meter that can work in both mode VU classic and in mode PPM (peak-program-meter).
It is therefore possible to monitor, in a certain sense, the average level of the signal, or the peak level, imagining to work in a totally analog context.
As for the tape recorder, like "2 inch 24-track tape machine", there are few controls, packed in a compact, easy to read and understand interface. So there isn't much to act on and this definitely saves time in practice.
In the center they are located REC LEVEL and PLAYBACK LEVEL, i.e. recording level and playback level. These can be linkedin order to keep the perceived volume level as constant as possible during adjustments. We will go deeper into the question concerning these two checks shortly.
Below we have TAPE SPEED, which allows you to adjust the rotation speed of the tape, with the possibility of choosing between three different speeds: 7.5, 15 and 30 IPS (inches per second).
We are then in control of BIAS, with two positions, NORMAL and OVER, through which we can add a very high frequency signal; in the past it was said that it could improve the overall sound, thus working in OVERBIAS, in this case + 3dB.
From a timbral point of view, as regards TAPE DESK, this parameter affects the high frequencies and gain a little. In any case, let's talk about elegant and gentle adjustments, which affect the tone in a minimal way: experimenting costs nothing.
Control WOW FLUTTER influences the speed of rotation of the belt, highlighting a typical defect of these devices: the non-constant speed of rotation, in real situations. In practice, I can determine at my will how inconstant the speed of rotation of the tape must be, with a consequent modulation of the pitch of the audio signal, not indifferent, especially if you exaggerate with this control.
We can virtually have an ideal belt, constant in speed at 100%, or add some imperfections, perhaps in a creative way, or to give a touch "vintage”To the audio signal.
I would also like to say a few words on the parameter TOLERANCES: enabling it, an algorithm comes into play that simulates the tolerance of the components of the channels that make up a hypothetical analog bench. I loaded, for example, a mono track and a stereo instance of Tapedesk. I then enabled this parameter, and I realized that there is actually a difference between the left and right channels: they are not perfectly equal precisely because of the tolerance of the virtual components that make up the two channels of the bank considered.
The programmers therefore offer us the possibility of being able to live, in a certain sense, an "analog in the box" experience, highlighting the imperfections, good or bad, that are part of the DNA of analog machines.
Electronic components have tolerances, which are noted in the product tables, expressed as a percentage. A 2k ohm resistor might have a resistance value of 1,8k or 1,9k, for example. So we can well imagine that two analog devices, apparently the same on paper, will not sound the same in reality.
The frequency response of the whole system: some tests
Now let's see how the frequency response of the entire system varies with some controls.
For the moment I consider only the s4000 console and vary the control TAPE SPEED, keeping the MIC PRE simulation always on. So I let the three blocks that make up this system interact totally. Also, as a test signal, I took the classic white noise. So let's go and see the results obtained.


As you can see, this system does not have a "flat" bandwidth from 20 hz a 20khz; to be precise, as the speed of the tape decreases there is a greater cut in the high frequencies and a smaller cut in the very low frequencies.
We certainly can't talk about "transparency", and that doesn't surprise me that much, since I'm analyzing one virtual analog chain, in which there is also a tape recorder, for which it is not possible to think in these terms.
It is also necessary to consider the contribution that the analog desk gives to the whole: in fact, with the same speed of the tape, the various banks alter the frequency response of the system. I take as a reference the setting a 30IPS.


The s4000 bank, compared to the other two, is the one that has the most balanced frequency response; the N80, on the other hand, emphasizes the mid-high range more; finally, the T88 bank is the one that has the most extended bass response.
By combining tape speed and the various virtual analog banks, we can therefore obtain various timbre combinations, having only a few controls available.
As regards the BIAS, from the graphic point of view it doesn't change much: as I said previously, the BIAS influences everything in a gentle way.

Some considerations
In this test I used a REC LEVEL equal to 0 VU, linking it to PLAYBACK LEVEL. The other stages, on the other hand, work around 0 PPM.
By default 0VU is set to -14dBFS, although we can still change this value, by going to the menu at the top right, and then calibrate the meter as we like. Changing this value obviously does not involve changing the headroom of the total system: it is simply a matter, more than anything else, of habit and / or comfort. In reality the 0 VU, in digital, corresponds to a value that depends on the analog device that is being used externally, as well as on its headroom.
THD (total-harmonic-distortion)
Let's see if somehow this plugin generates distortion / saturation and to what extent. I use the classic 1000hz sine wave as a test signal: so let's see if this system gives the signal harmonics.
The tape recording level is always 0 VU = - 14dBFS, linked to the playback level, with the other stages working around 0 PPM. The MIC PRE it is always activated, and the reference console is the S4000. BIAS is normal, with tape speed a 30IPS.


So we are dealing with a system not linear: I send in a sinusoid and as I raise / lower the input level it returns, at the output, not simply a sinusoid, amplified or attenuated, but a sinusoid with the addition (or not) of a combination of equal harmonics and odd, definitely not a pure sine wave.
As for the MIC PRE section, if we deactivate it, the contribution of the harmonics is attenuated; clearly, the various analog banks also contribute to this.
Testing with a lower tape speed obviously subtracts some harmonics in the high range.
I conducted a further test with a more stringent setting: MIC PRE at maximum (0 VU), as well as the recording level of the tape, linked as always to the playback level. The final stage works at 0 VU.

In this case, a very evident saturation comes into play, which emphasizes the odd harmonics more and which we can define as "warm tape”, At least for this particular tape recorder; the result is a well recognizable sound, which we can only find in this type of plugin.
If I took an oscilloscope, I would notice that the sine wave in this case would start to take on a square shape, similar to a pseudo square wave.
Now I try a last setting: MIC PRE at maximum, low recording level, not linked, and playback level knob at the end of the stroke; the final stage works at +3 VU.

The result is similar to the one visible in the second image, with the difference that there are more harmonics and this time the even ones tend to be a little more emphasized.
This happens because, in this case, I gave a higher “priority” to the section relating to the analog desk (including the preamp), trying to overload the channel in an evident way.
I therefore obtained another type of saturation, making the most of the characteristics of the deck considered, while keeping the recording level of the tape low. By then moving from one desk to another, you can get other sounds: as I have already written, experimenting costs nothing.
A first suggestion to programmers is to insert a control to adjust the signal level, before entering the MIC PRE stage, and another control after the last stage, in order to adjust the general output level, perhaps (because no?) after having overloaded the bench channel in a very evident way. It would also be a good thing to insert a dry - wet control, so the plugin would become even more "nice" and flexible.
We have seen how these three sections interact with each other, both from the point of view of frequency response and from the point of view of saturation, and we have seen that this system does not know the word "transparency" and "linearity" at all (as is right that is). The company, moreover, had warned us "on guard", saying:
“- Faithful interactions between the console and the tape machine
- Simulation of all transformers in the original units "
Latency and CPU consumption
This plugin has a consumption of Low CPU, in fact I put it in the category of low CPU consumption plugin (for further information I suggest you read my previous article).
The latency is a few samples (4 samples working on 44100 hz), but only if oversampling is activated (by default it is active), so there is no need to worry in the least.
"Nice" functionality
This plugin offers the possibility to put labels, which we can rename to our liking: just go to the menu at the top right and click on “Add Scribble”.
The audio test: some considerations
Some colleagues / insiders have provided me with tracks to test TAPEDESK on. You will find details on the audio test at the end of this article.
I tried to put into practice what I talked about previously, in the part concerning the graphic tests.
Conclusions
The plugin costs 179 € (it is also possible to find it at a discounted price), so it is not included among the "consumer / cheap" plugins.
The positives are:
- Quick to set up
- Good versatility
- Low CPU consumption
- The tape has a convincing sound and you don't get lost in a myriad of knobs, considering it has few (but good) controls: 100% time saved
- The three analog banks (MIC PRE included) offer the possibility of giving further color to the sound, both from the point of view of equalization and from the point of view of saturation, immediately, with a simple click.
I remember that the three sections can however be deactivated individually, so we are not bound to any of them from the point of view of the sound color; if we deactivate the analog desk, the part relating to the channel preamplifier is also deactivated.
In summary, we are dealing with very good plugins, in my opinion, better than some of its competitors. There are many such plugins out there, but not all of them sound convincing al 100 %, or at least they don't have the same completeness as this one, and I'm not referring to versatility, but to the overall sound. Let's imagine it as a device that at the same time equalize, compress and / or saturates the signal, therefore it confers color to sound, thanks to the characteristics of the various stages. The fact remains that it is still necessary to experiment to find your own sound.
Of course, future upgrades are welcome, for example the inclusion of those controls I mentioned previously, maybe some other model of virtual tape and / or the possibility of being able to slow down the tape even more. In any case, there is no doubt: this plugin is absolutely recommended. I leave you to the audio part, plus some useful links.
That's all for today, see you next time.
Joseph Marrazzo
Ps: use of good monitors is recommended for listening to audio files, otherwise you may not perceive the difference between “bypass” and “ON”.
Furthermore, the list of audio files may be updated, so I recommend that you consult this article periodically.
Demo audio files: various MIXBUS
Let's put this plugin to the test immediately, using it on various mixbuses: the settings are obviously not extreme, but listening carefully you will notice some differences ...
Please note: these mixes were processed using only Tapedesk: I looked for a setting that best matched the sound characteristic of the single mix. Therefore, these are absolutely not to be considered as finished masters!
I thank the studio "GodFather Studio" and Mr. Massimiliano Pone for providing me with the audio material, to test the Tapedesk plugins.
TOLERANCES and MIC PRE they will always be active.
MIXBUS 1: 7.5 IPS –T88 - wow low medium flutter
MIXBUS 2: 15 IPS - N80 - wow low flutter
MIXBUS 3: 30 IPS - S4000– OVERBIAS - low wow flutter
Links
Official site: https://overloud.com


